Or more than you ever wanted to know!

Boot fitting used to be easy.  You would go and try on a boot and you really only had two major criteria, length and pain.  Length was easy.  With your foot in the boot you wanted your toes touching the end.  When you buckled it your toes should pull back a bit.  For the rest you wanted a bit of pain at first so when the liner packed out you still had a decent fit without 62 socks.  That was before the widespread use of thermo fit liners.

Fitting Telemark Boots

Now things are a lot more complex - but good fit is still key to boot performance.  Unfortunately you can now make way too many boots fit with thermo fit liners but that does not mean you will get good boot performance.  Because the liners will make almost any boot comfortable you need to be much more careful with the fit now.


Step 1 - get an idea of your foot size.  Telemark and Alpine Ski boots are sized based on the Mondo Point scale.  It is really the most rational of all foot sizing measures.  It is based simply on the length of your foot in centimeters.  So I measure a little over a 28 cm foot and I wear typically a 28.5 shell in a ski boot.  To measure your foot put a piece of paper on the floor up against the wall.  Stand on the paper with your heel against the wall.  Make a mark on the paper at the end of your longest toe.  Measure the resulting length in cm and you have your mondo point size.  Telemarkski.com has a great page which outlines this method and provides the sizing charts for Garmont, Scarpa and Crispi.


Step 2 - fit the shell.  You want to be in the smallest shell you can get.  This means about 1 cm between your heel and the back of the shell with your toes touching the end.  Don't smash your foot up against the front of the shell slide it forward gently until it touches.  Then have a look at your heel in the boot.  You should have about 1 cm between your foot and the back of the shell. Forget fingers. There is no way you can get your hand back there at all if the shell is the right size.  Have a look with a flashlight or use a dowel or something similar.  Fundamentally you want to jam yourself into the smallest shell you can.


Step 3 - fit the liner.  Use a very thin sock - ie a liner sock not a thick ski sock - dress socks work too.  If you have the right shell size the liner will be tight before you thermo form it.  Try on the liner outside the boot.  It should be tight and your toes should be right at the end.  Basically the boot fit and liner fit should be tight and borderline uncomfortable with the right size boot before you thermo form them. 


You have to fit your big foot if you have one for obvious reasons!  With as small a shell as possible you have to fit for the larger foot or the boot won't fit both feet.


Step 4 - get a good footbed! Throw out the crappy one that comes with the boots (depending on your foot this may not apply to Intuition liners so get a shop who knows the liner and ask).  Green Superfeet work well as an off the shelf footbed.  Some people like to trim the little grey plastic fingers on the front of the Superfeet footbed.  Personally I don’t  see much advantage either way. Make sure the footbed is long enough in the arch, regardless of the shoe size on the liner box.


Step 5 - thermo form the liner.  You want to use a sock that is really thin.  This allows the liner to pack out a bit after it breaks in and then you can use a thicker ski sock later to fill the space.  Use toe caps while thermo forming the liners! This creates space in the front of the toes and pushes the heel back into the heel cup.  I like the hard toe caps as they create plenty of space for your piggies.  If you have the right size boots thermo forming will hurt.  Sorry to break it to you but it ain't going to be fun!  If you don't want to do this yourself get a reputable shop to do it.  For those of you brave enough to do your own there is the iconic TTips video - cooking with Big Tim.


Disclaimer - If you cook your liners using the following information and the liners are no longer usable I take no responsibility. If you are not confident in what you are doing go to a reputable shop.


Garmont Liners - 15 mins at 250°F (120°C) in a convection oven.


Black Diamond Liners - use the BD approved heat pipe blower.


Scarpa/Intuition Liners - use Intuition heat pipe blower or a convection oven.  The Scarpa and Intuition Power Wrap liners are different.  The Scarpa variant is 6mm soft and 6 mm high density foam while the Intuition liner is 3mm soft and 12 mm high density.  If you are using a convection oven @ 120°C heat for 8-10 min for the Scarpa and 12-15 min for the Intuition.  If you have any questions about the Intuition liners call Intuition.


Insert the foot bed into the liner and make sure it is flat.  Then insert the foot into the liner and carefully into the boot.  Some form of shoe horn will help get the fragile hot liner into the shell.  Do not use the laces while thermoforming the liners.


Step 6 - throw out the stock “power” strap.  The velcro “power” strap that comes with most telemark boots is not ideal.  Replacing it with an elasticized power strap, such as a Booster Strap is a good investment.  The content free website aside the booster strap allows a much better connection between the boot and your shin.  This is especially advantageous for telemark skiing.  Scarpa T-Race boots currently ship with booster straps as standard equipment.


So the big question - why fit the boots so tight?  Won't my feet be cold, etc?  Perversely the opposite is true.  With a good performance fit for the boots your feet will be warmer.  This happens because you can ski your boots with looser buckles and still get good performance.  If you are tightening your current boots as much as you can then they are very likely too big or you have picked a boot brand that will not fit your foot.


Paul Parker & Mitch Weber © TelemarkTips.com

75mm Fit -


Garmont - wide feet with moderate to high volume. Except for the Voodoo which shares the NTN Garmont fit.


Crispi - wide up front but overall less volume than Garmont especially over the toes and with a narrow heel.


Scarpa - generally less wide and with less volume.  Fits a normal foot ie D width in men without lots of volume.  Also has an asymmetric bellows that feels different than the other two. 


Black Diamond - medium width and volume.  Fairly narrow heel. 


NTN Fit -


Garmont - medium volume and medium width - definitely narrower than 75 mm Garmont boots.  Asymmetric bellows.  Very form fitting with a pre-punched shell.


Crispi - different fit in the two models.  The Evo is the narrowest NTN boot, moderate volume.  The Evo Shiver is a medium width and volume boot more width than Garmont.


Scarpa - The highest volume and widest NTN boot. Asymmetric bellows.


In 75mm Scarpa is the narrowest and lowest volume, in NTN it is the widest and highest volume.


Shell Breaks -


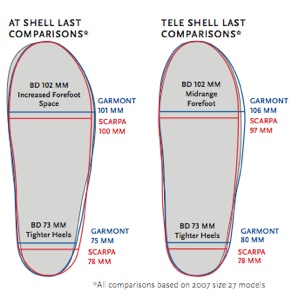
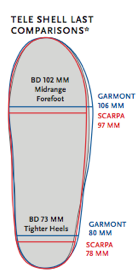
The other thing to be aware of is the way the shells are sized.  Generally the shells serve more than one size.  For example in my boots the 28 and 28.5 share the same lower shell.  This is typically printed on the inside of the shell and can be seen with the liner removed.  So why do we care about this?  Generally you want to be in as small a shell as possible so knowing where a manufacturer has his shell break means you can try to be in the high end of a given shell size so you have as little liner as possible.  Manufacturers simply increase liner thickness in the smaller size to make up the volume, this leads to the possibility of more pack out. The shell breaks by manufacturer as far as I can tell are -


Garmont breaks on the 1/2 size so 28 and 28.5 share the same shell.


Cripsi breaks on the full size so 27.5 and 28 share the same shell.


Scarpa breaks on the full size so 27.5 and 28 share the same shell.


Black Diamond breaks on the 1/2 size so 28 and 28.5 share the same shell.


You can always check this by finding the shell size with the liner out (make sure you are looking at the lower shell the cuff is totally different and not really relevant).


The video with Paul and Mitch covers pretty much the same ground but you get to hear Paul talk about going to the outhouse and painting his toenails!


BTW you get extra credit if you correctly identify the boot in the header photo!


-


Larry White - Larry is a CANSI Telemark Instructor and Telemark Course Conductor and a CSIA Alpine instructor - Dec 2, 2008.


If you have feedback or useful suggestions email - bootfitting.


Dec  18, 2008 - added new first step - determining your foot size.

Nov 12, 2009 - updated shell fit information with BD info and added a section for 75 and NTN.  Added information on thermoforming Garmont, Intuition & BD Liners.

Nov 16, 2009 - added info on the Garmont Voodoo and footbed sizing.

75mm lasts © BD Tech Manual 2008